Line Follower Robot Kit 4,000.00৳ Original price was: 4,000.00৳ .3,600.00৳ Current price is: 3,600.00৳ .
“6V-100 MAH (70 x 70 x 03 mm) Mini Solar Panel Square Shape With 5V Boost Step Up Power Module Lithium Battery Charging” has been added to your cart. View cart
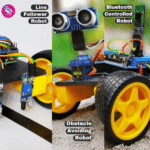
3-in-1 Robot Kit – Build a Line-Follower, Obstacle-Avoider, AND Remote-Control Robot
Line Following Robot
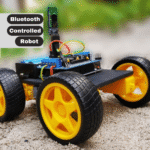
Bluetooth Controlled Robot
Obstacle Avoiding Robot
একটি গবেষণা নির্দেশ করে যে অনেক নতুন রোবটিক্স enthusiast বিভিন্ন চ্যালেঞ্জের সম্মুখীন হন, যেমন বিভ্রান্তিকর অনলাইন টিউটোরিয়াল এবং ত্রুটিপূর্ণ যন্ত্রাংশ। সঠিক নির্দেশনা এবং সঠিক যন্ত্রাংশ ছাড়া, আপনার রোবটিক্সের স্বপ্নগুলো খুব দ্রুত অর্থ এবং সময় অপচয়ের দুঃস্বপ্নে পরিণত হতে পারে।
এই বিশেষভাবে মডুলার রোবট কিটে আপনার তিনটি চমৎকার রোবট তৈরির জন্য প্রয়োজনীয় সমস্ত কিছু অন্তর্ভুক্ত রয়েছে: একটি লাইন ফলোয়িং রোবট, একটি অবস্টেকল এভয়েডিং রোবট এবং একটি ব্লুটুথ নিয়ন্ত্রিত রোবট। এতে রয়েছে সঠিক যন্ত্রাংশ, পূর্ব-লিখিত আর্দুইনো কোড, স্পষ্ট সার্কিট ডায়াগ্রাম এবং সহজ step by step টিউটোরিয়াল।
Learn Robotics from the beginning
Build 3 different robot, within cost of one chassis
Ultrasonic Sensor based Obstacle Avoiding Robot Car
IR based line follower car
Android controlled Bluetooth car
Simple plug & play type robotics project (Do-it-yourself project)
বক্সের ভিতরে QR স্ক্যান করলেই পাবেন সমস্ত কোড, সার্কিট ডায়াগ্রাম এবং রোবট বানানোর নির্দেশনাবলী
Inside the Box Includes:
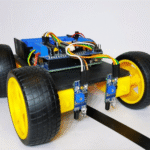
Hardware: Arduino Uno R3 Dip(1), Arduino cable, Motor driver shield(1), Gear motors (4), Robot wheels (4), Chassis board(1), Li-ion batteries (2), Battery holder(1), Battery charger(1), on/off switch(1), Ultrasonic sensor(1), Ultrasonic sensor holder(1), Servo motor(1), Bluetooth module(1), IR sensor modules (2), Jumper wires (M-M, M-F, F-F), Double-sided tape, Zip ties, Screwdriver, and scissors.
Software: Arduino code, Circuit diagrams, and an app.
Service: Step-by-step tutorials.
Build Three Unique Robots with the above Set of Components
বক্সের ভিতর parts and devices ব্যবহার করে আপনি তিনটি মজার রোবট তৈরি করতে পারেন—লাইন ফলোয়িং রোবট, ব্লুটুথ নিয়ন্ত্রিত রোবট, এবং অবস্টেকল এভয়েডিং রোবট। প্রতিটি রোবট ভিন্ন কাজ করে, এবং কিছু parts and devices বদলালেই আপনি একটি রোবট থাকে অন্য একটি রোবট তৈরী করতে পারবেন। দেখে নিন, আপনি কীভাবে এটি করবেন:
Line Following Robot
লাইন ফলোয়ার রোবট: এই রোবটটি একটি কালো লাইনের দ্বারা চিহ্নিত পথ অনুসরণ করার জন্য ডিজাইন করা হয়েছে। এটি মৌলিক রোবটিক্স এবং সেন্সর সংযোগের সঙ্গে পরিচিত হওয়ার জন্য একটি চমৎকার রোবোটিক্স প্রজেক্ট ।
Components:
Arduino Uno
Motor driver shield
Gear motors and wheels
IR sensors (2)
Li-ion battery and holder
Chassis board
Jumper wires
Steps:
Programming: Use simple logic to detect the line. The robot will follow the line using the IR sensors to adjust its direction.(you will get the program inside the box)
Assembly: Attach the motors and wheels to the chassis and connect the motor driver shield to the Arduino Uno. Mount the IR sensors at the front underside of the robot.(you will get the circuit diagram inside the box)
Wiring: Connect the IR sensors to the Arduino (VCC to 5V, GND to GND, signal to analog pins) and wire the motors to the motor driver shield.
Testing: Place the robot on a black-lined track and observe how it follows the path.
Transition to
Bluetooth Controlled Robot
Bluetooth Controlled Robot – Easy Plug and Play
ব্লুটুথ কন্ট্রোল রোবট, যা আপনাকে স্মার্টফোনের মাধ্যমে দূর থেকে রোবটি নিয়ন্ত্রণ করার সুযোগ দিবে।
Changes:
Remove: IR sensors from the Line Following Robot.
Add: Bluetooth module for wireless control.
Components:
Arduino Uno
Motor driver shield
Gear motors and wheels
Bluetooth module
Li-ion battery and holder
Chassis board
Jumper wires
Steps:
Programming: Upload a program that reads Bluetooth signals from your smartphone app to control the robot’s movement.(you will get the program inside the box)
Assembly: Reuse the chassis, motors, and shield.Keep the setup as it is only replace the IR sensors with the Bluetooth module. (you will get the circuit diagram inside the box)
Wiring: Connect the Bluetooth module to the Arduino (TX to RX and RX to TX).
Testing: Pair the Bluetooth module with your smartphone, open a Bluetooth control app, and navigate the robot wirelessly.
Transition to
Obstacle Avoiding Robot
অবস্টেকল এভয়েডিং রোবট: এই রোবটটি বাধা সনাক্ত করে এবং সেগুলো এড়িয়ে চলে, যা রোবটিকে সত্যিই স্মার্ট করে তোলে।
Changes:
Remove: Bluetooth module.
Add: Ultrasonic sensor and servo motor for obstacle detection and avoidance.
Components:
Arduino Uno
Motor driver shield
Gear motors and wheels
Ultrasonic sensor
Servo motor
Li-ion battery and holder
Chassis board
Jumper wires
Steps:
Programming: Write code to scan for obstacles using the ultrasonic sensor. The robot will change direction if an object is detected.(you will get the program inside the box)
Assembly: Keep the chassis, motors, and shield. Keep the setup as it is just remove the Bluetooth module and Mount the ultrasonic sensor on the servo motor and attach it to the front of the robot.(you will get the circuit diagram inside the box)
Wiring: Connect the ultrasonic sensor (VCC, GND, Trig, and Echo) and the servo motor to the Arduino.
Testing: Test the robot’s ability to navigate around obstacles, avoiding collisions in real-time.

 Pick up from the Roboticshubbd Store
  Courier delivery
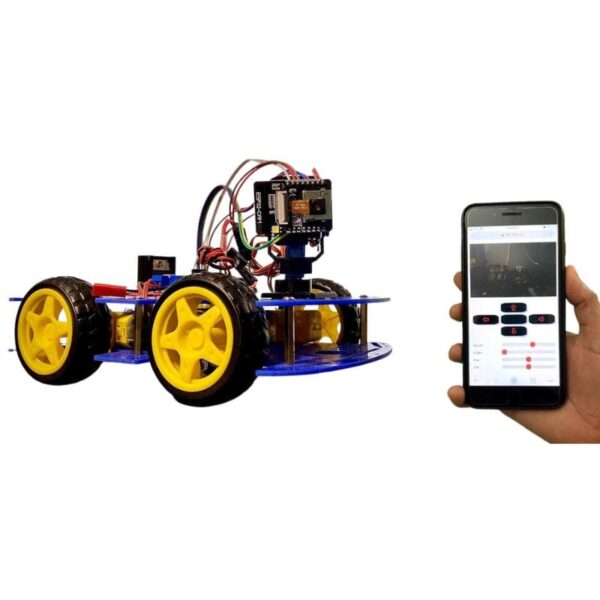


")


Reviews
Clear filtersThere are no reviews yet.